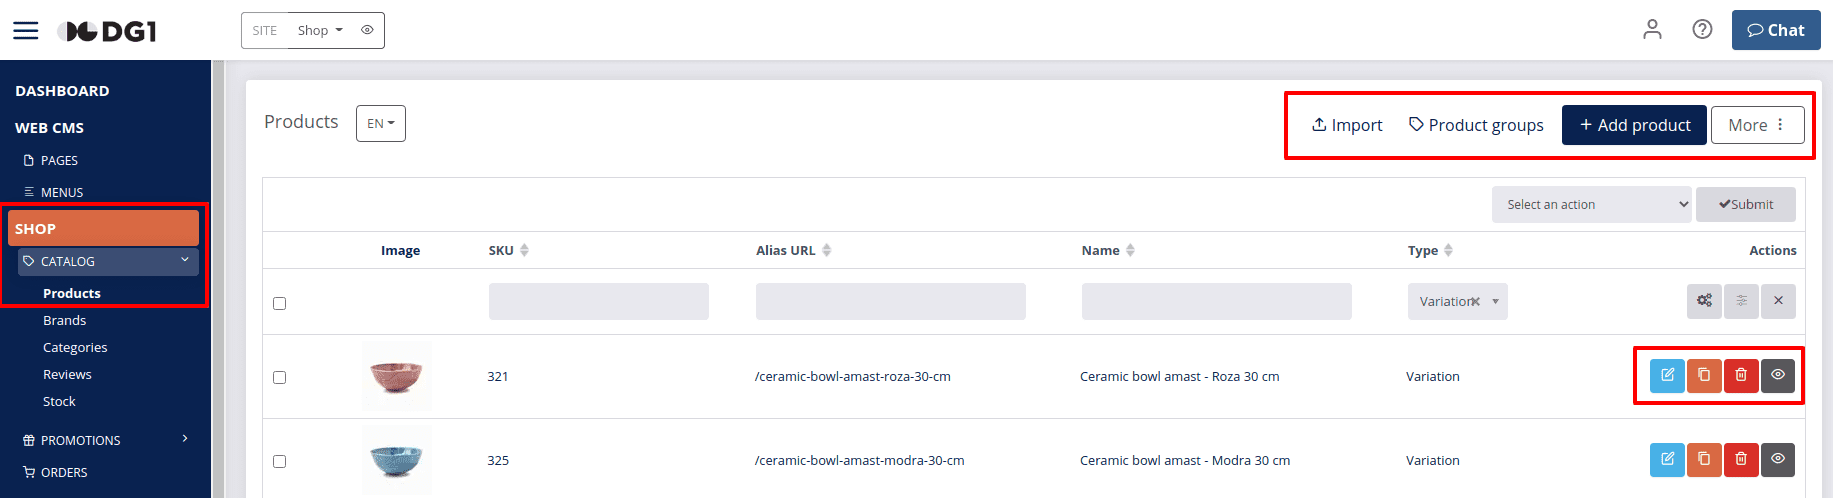
# Products
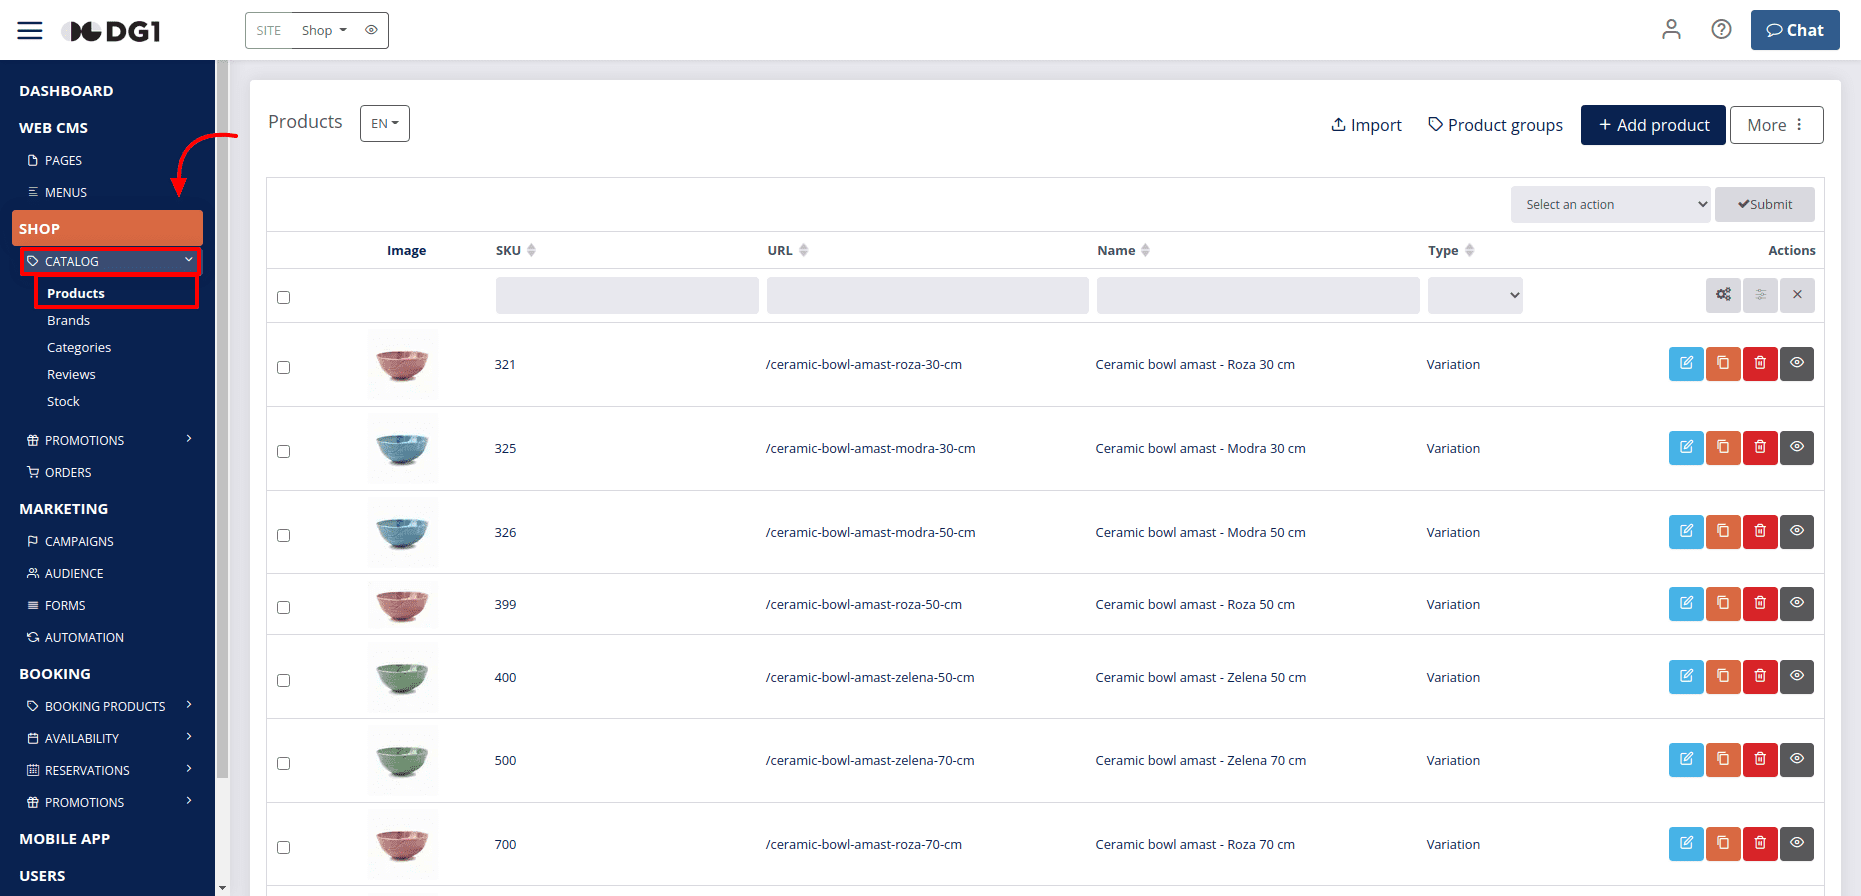
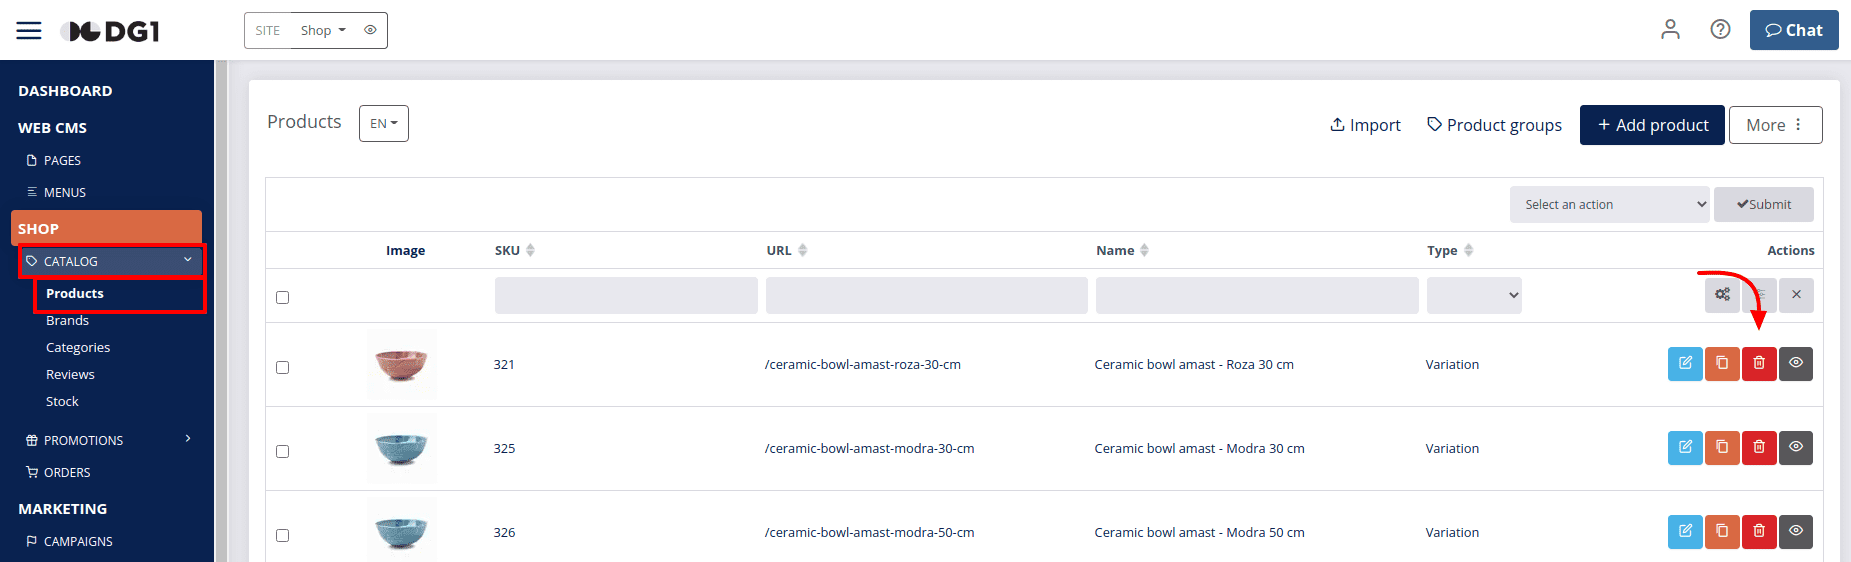
To manage your products, navigate to SHOP -> Catalog and select Products. Once you have added products to your shop, this is where you will find them listed.
On the products page you can edit  , delete
  , copy
  or add
  products. You can also Import
  or Export products
  .
.
Note
When you import products, all the product information in your shop is updated according to what is specified in your import document. So, if you import the same products that you already have in your shop and which you’ve edited manually or even deleted, the import function will overwrite any such changes with the details from your import document and you may end up having to enter the same changes again. Because of this you should of course be careful with what your import document contains.
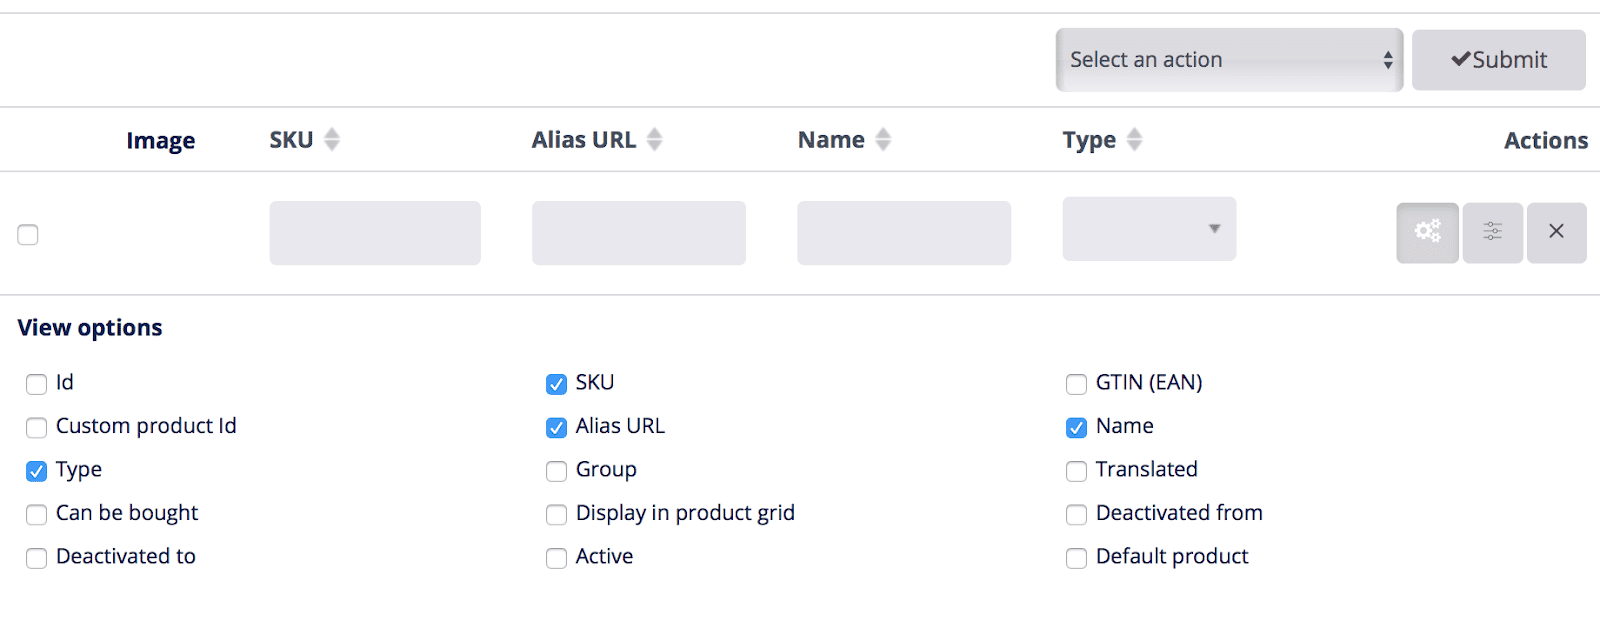
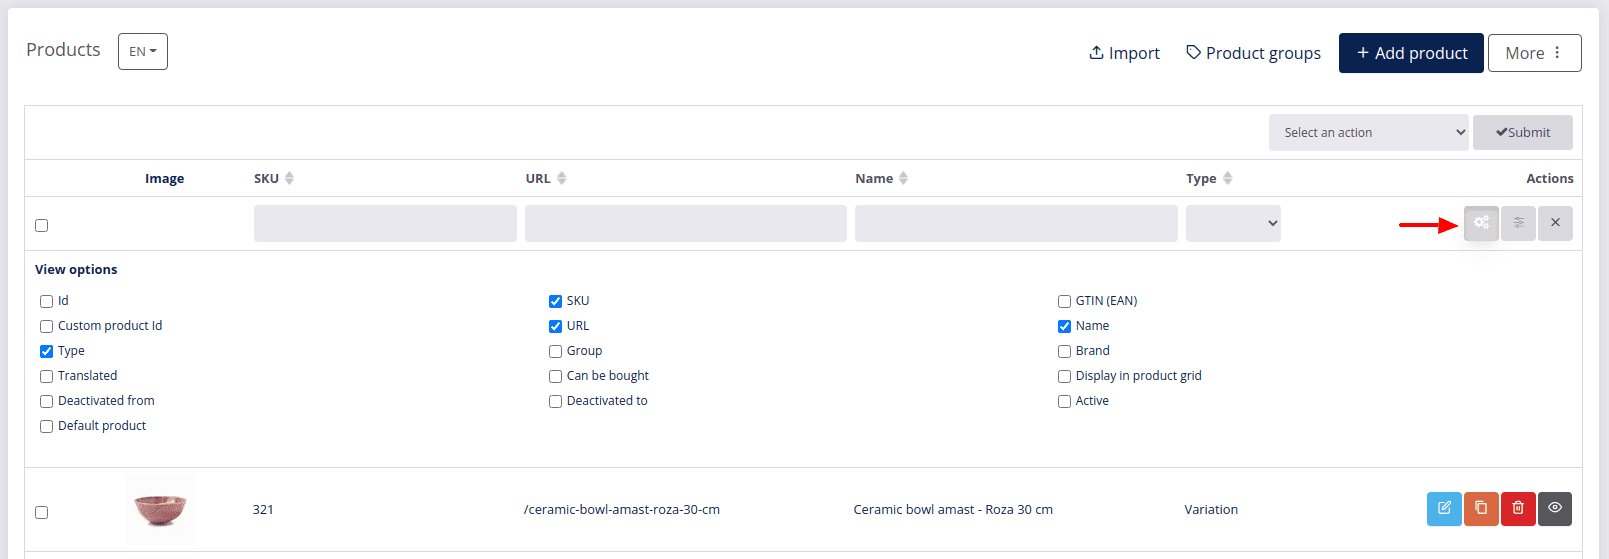
By default, your Products page displays product Name, Type, stock-keeping unit or SKU and URL columns. To see more columns on the Products index page, click View options  , check the boxes for data that you would like to see in your products page, and all the columns you select will appear in the page header.
# On this page
# Add new product
Before adding a new product to your shop, you should first prepare the following sections:
- Categories
- Brands
- Product Group (only if it is different from Default one or if you will add products with variations)
- Taxation rules (only if any special taxation rules will be applied to added products)
- Attributes and attribute groups (only if you wish to add additional ones besides default)
Note
New attribute groups can always be added on the spot when adding a new product.
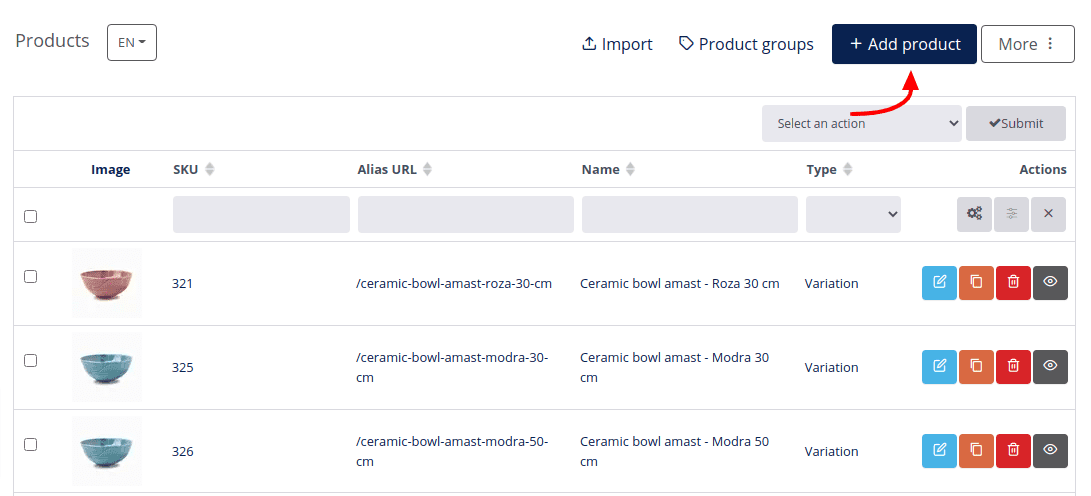
- Navigate to the Shop section in your DG1 platform, select Catalog and click Products.
- Click Add product to add a new product.
Note
New users, adding the first product to their shop, are redirected to the Add new product page to enter the product details, described below under step 4.
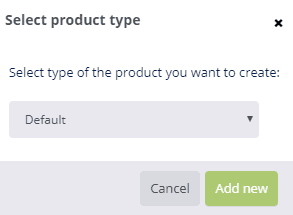
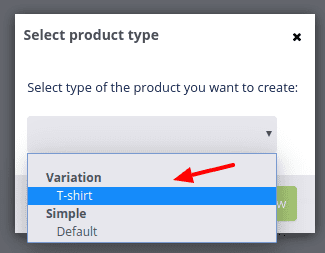
- Select product type and click Add new
 .
.
As each product requires a lot of information before it can be added to your shop, it is worth spending some extra time to get familiarized with all the product details fields. The details you provide change the way a product is displayed and help your customers find the product. They also make it easier for you to organize your products. You do not have to provide every detail for each product but the more the merrier.
- Below is a detailed overview of all the product details in tabs on the Add new product page:
# Product info tab
- General settings
- Name - The name is a word or a set of words by which your product is known.
- URL - Automatically generated URL for your product based on the name of the product.
- Short description - Description of a product, which should not exceed 220 characters. All the other product information should be added to Attributes.
- Price with tax / Price without tax - This is your gross or net price, which depends on the general settings in your Site section.
- Tax rate - Add the tax rate, which is valid in the country where your products are sold and shipped to (country-specific).
- Show price - By default the price is inherited from the type of product group selected for each product. But you can also decide to Show the price or Hide the price of each product.
- Product can be bought - Uncheck this option to prevent the purchase of the product. The product will still be visible in your online shop but nobody will be able to buy it.
- Measurement unit - Select the measurement unit which will be used when calculating price per unit.
- Net quantity - Quantity in one purchase. Refers to Add to cart unit. Example: If the price for a net quantity of 0.25 kg is 2 USD, the price for 1 kg will be 8 USD. Price per kg is automatically calculated by the system and shown in the front end of your shop.
- Add to cart unit - Select a unit that will be used when adding products to the cart. "Pieces" will prevent customers from entering decimal values into the quantity field. All other units will allow decimal values. (E.g.: 1.25 kg)
- Type - Type of the product group that you chose beforehand.
- Group - The name of the product group to which this product will be added.
- Brand - The name that distinguishes the products in the eyes of the customer.
- Categories - Each product has to be placed in a certain category or subcategory. By clicking checkboxes, you can decide which category or subcategory the product will be placed in. Example: Fitaki fresh cheese. Add product under “Milk, eggs and milk products” -> Cheese -> Feta cheese, mozzarella etc.
To learn how to add, delete or edit categories, see Product categories.

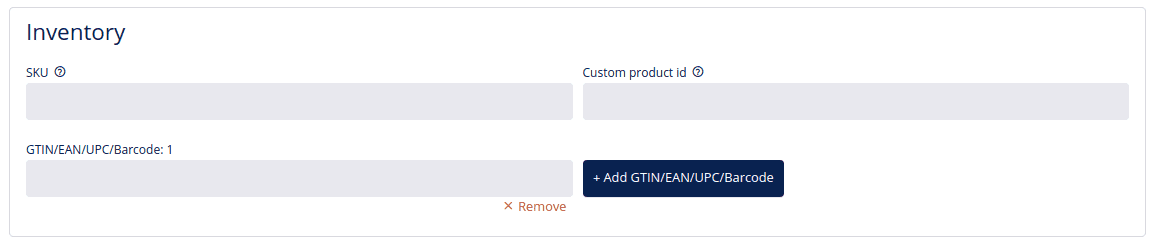
- Inventory
- SKU - Stock keeping unit is a unique number for the product. It is your internal number that helps you organize your inventory.
- Custom product ID - An additional number for identifying the product (optional).
- GTIN/EAN/UPC/Barcode - Global trade item number is another number you can add. You can add more barcodes by clicking
 +Add GTIN/EAN/UPC/Barcode, or remove them by clicking Remove.
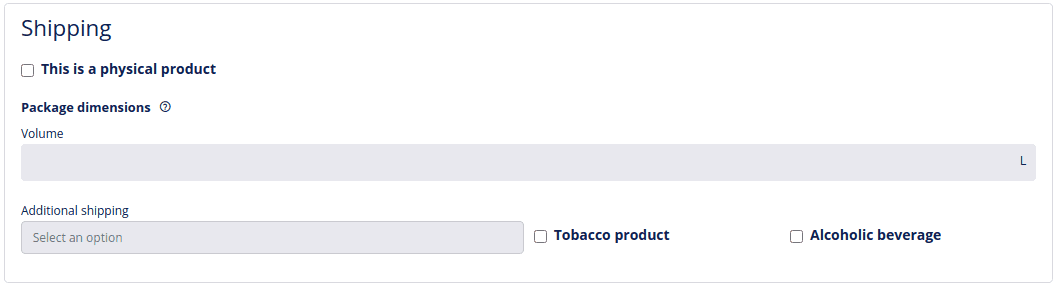
- Shipping
- Product measurements with packaging - If you check This is a physical product, simply enter all the product measurements with packaging. When unchecked, you can leave it as it is or add the volume of your product.
- Tobacco & alcohol - Check the corresponding checkbox for tobacco or alcoholic products.
- Additional shipping requirements - Here you can select Refrigerated and/or Fragile options.
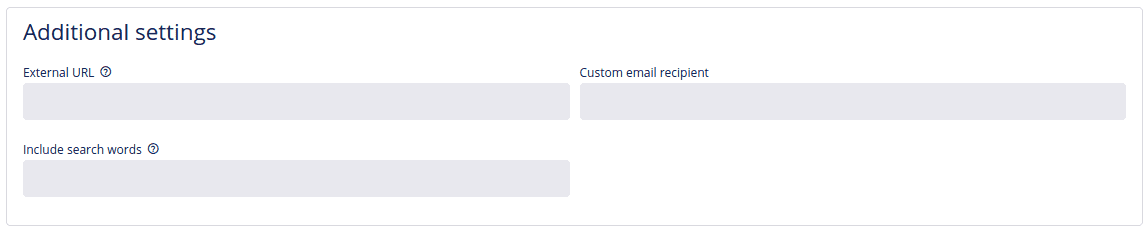
- Additional settings
- External URL - The user will be redirected to the URL instead of opening the product page.
- Custom email recipient - type the email address to which the order confirmation of this specific product will also be sent to.
- Include search words - you can define search words, which will help the internal search engine find the product.
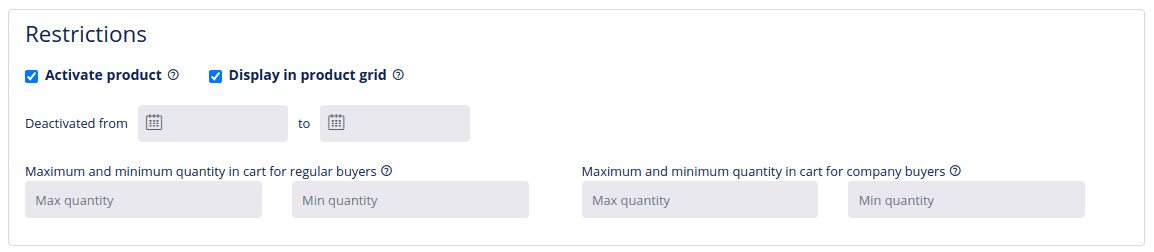
- Restrictions
- Activate product - uncheck this option to hide the product everywhere.
- Display in products grid - uncheck this option to hide the product in the product grid.
- You can choose to deactivate your product for a certain period. Use the fields with the calendar symbol after “Deactivated from/to” and select the start/end date and time to set the period during which the product will be deactivated.
- Quantity restrictions for regular buyers - Limit the sales or force the sales of a specific product per regular customer by using the maximum quantity restriction or the minimum quantity restriction. Maximum quantity is useful for shops with limited or controlled stock (Example: your customers can buy a maximum of 10 pcs of T-shirts). Minimum quantity is useful for shops with products sold by volume or weight (Example: Your customers have to buy a minimum of 1 kg of apples).
- Quantity restrictions for company buyers - Limit or force the sales of a specific product per company customer by using the maximum or minimum quantity restriction respectively.
- SEO
- SEO image - choose an image to enable Google search by image.
- SEO Description - a short description for external search engines.
- SEO keywords - These are search words used by external search engines. Example: Fitaki, cheese, fresh cheese, Greek cheese. You can use several words or phrases, as long as you separate them with commas.

# Images & videos tab
You can upload multiple images and add links to videos for each product in the Images & videos tab.
- How to add an image:
- Click Select files and then Upload.
- Click Upload files by and a new window will open.
- When you have selected a picture, click Open and then SELECT & CLOSE.
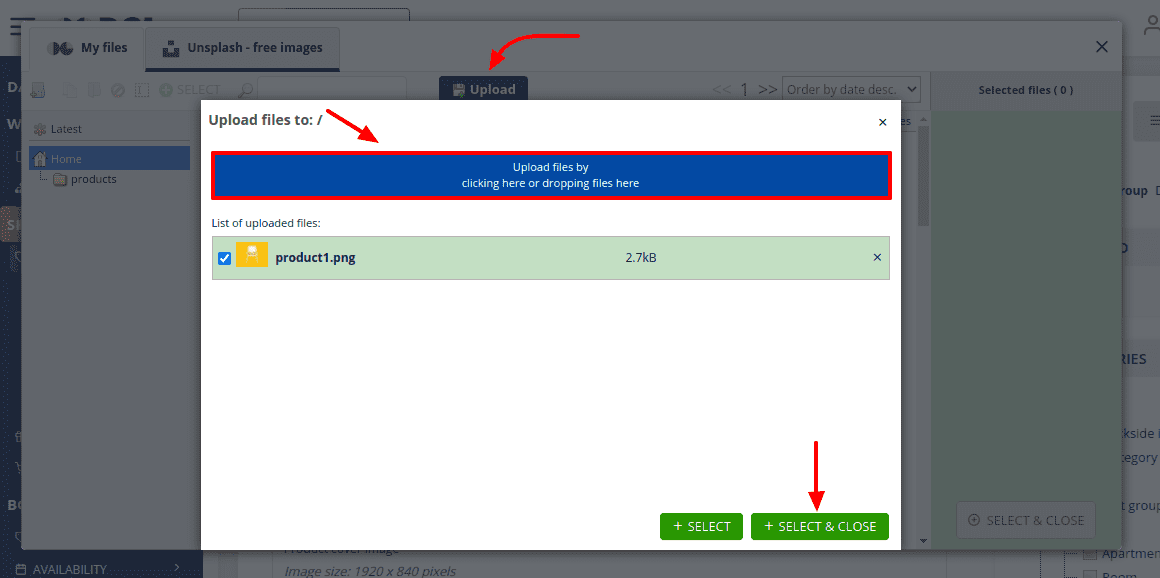
Note
Once a picture is uploaded it will stay in the File system database, until you manually delete it!
- How to add videos:
- Click Add a video
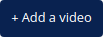 .
. - Paste a video URL from either Youtube, Vimeo or any other video sharing site. You can add up to three video links per product.
- Click Submit
 .
.
- Click Add a video

Note
You cannot upload a video from your computer.
# Attributes tab
To add attributes for your product, you must first create and group them. To learn how to create and manage them, see Attributes.
- To save the product, click Submit . The product will be saved and added to your Products index page.
# Add product with variations
Products sold in a variety of options such as different colors and sizes are called variations of a specific product. You might have also heard of the expression variant instead of variation. If you sell a T-shirt in three different sizes (small, medium, and large) and in two colors (red and black), you essentially have 6 variations of the same product, with one variation being a medium red T-shirt.
- Add all the attributes
- Create a product group
- Add attributes to an attribute group
- Add the default and variation products
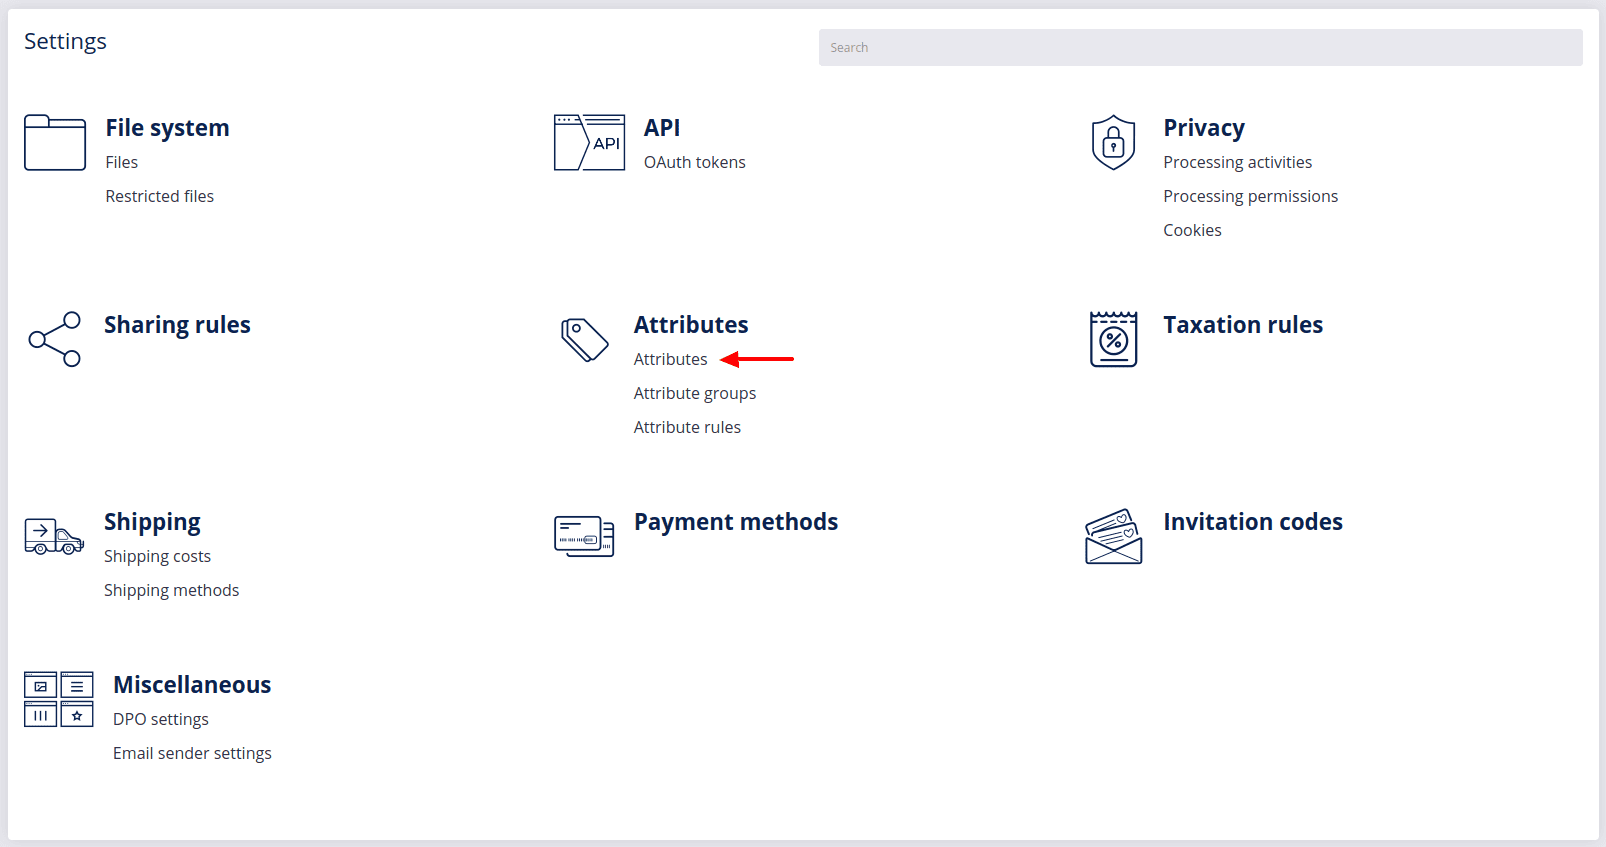
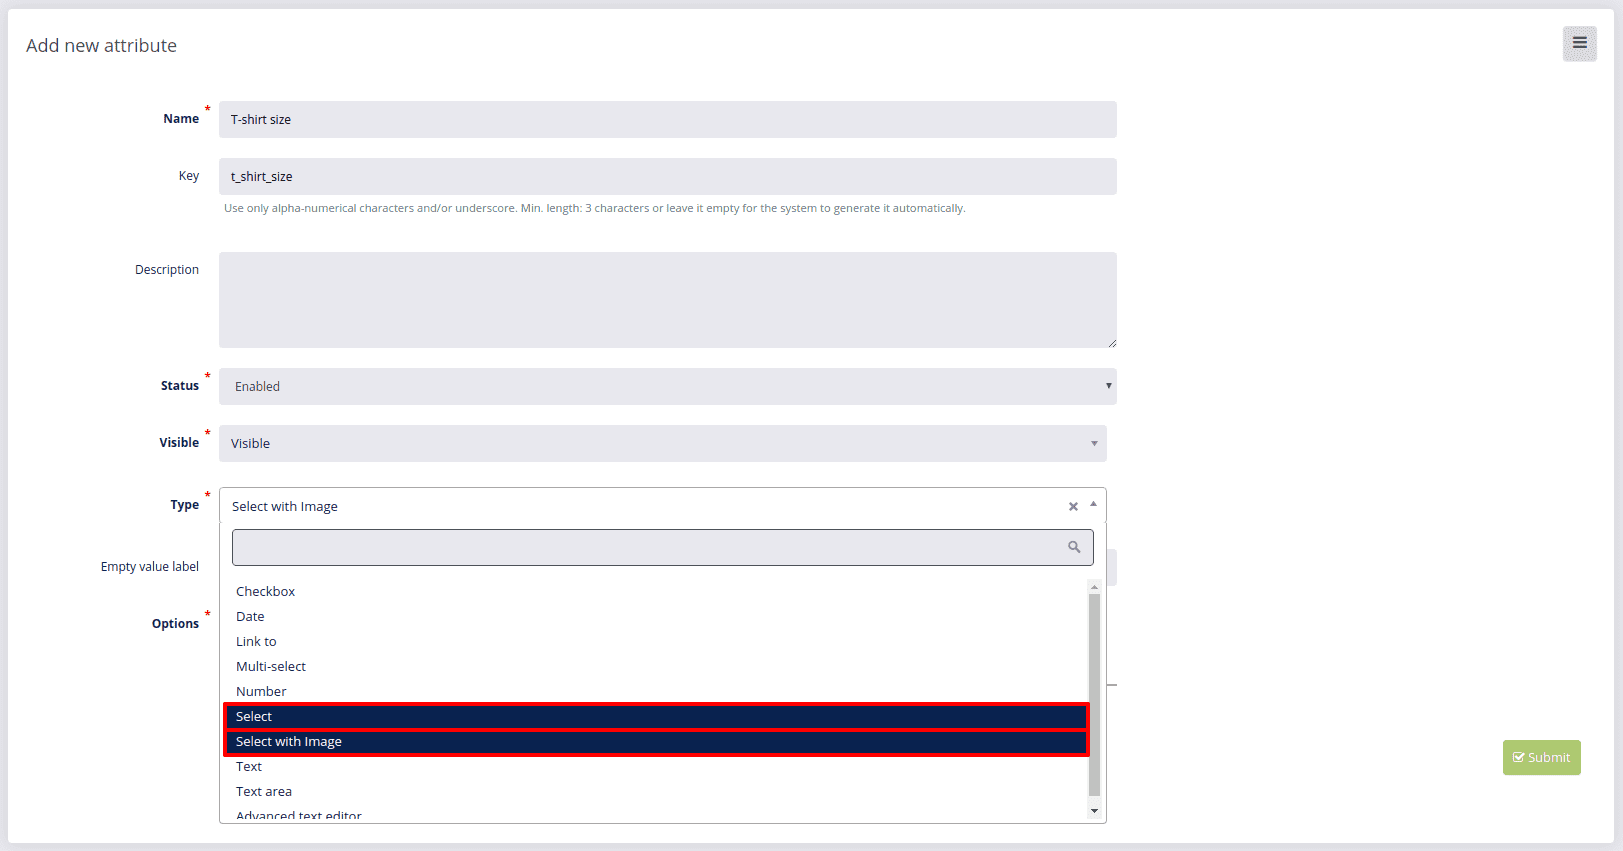
- Go to Settings -> Attributes in your DG1 admin panel and click Add
 in the top right corner.
Choose either Select or Select with image when you wish to show your customers available colors, sizes, or any other different options to choose from.
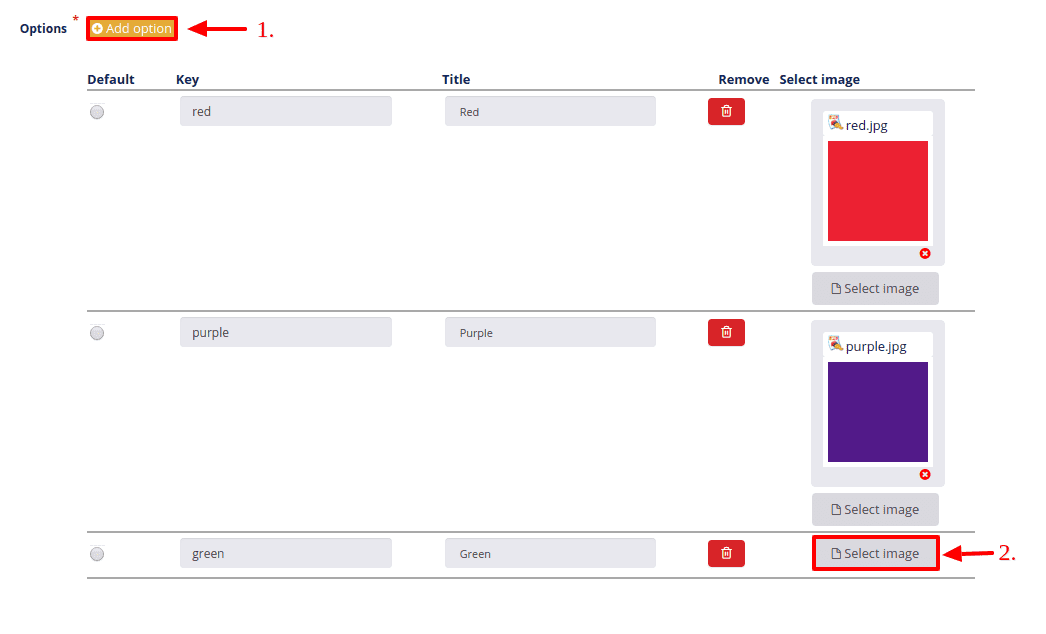
When adding the Select with image attribute, make sure you have an image for each option already prepared (in our case color), so you can upload it to your file selector. Click Add option and add the image with the color of your product. Do that for as many colors as you wish. Click Submit to save the new attribute.
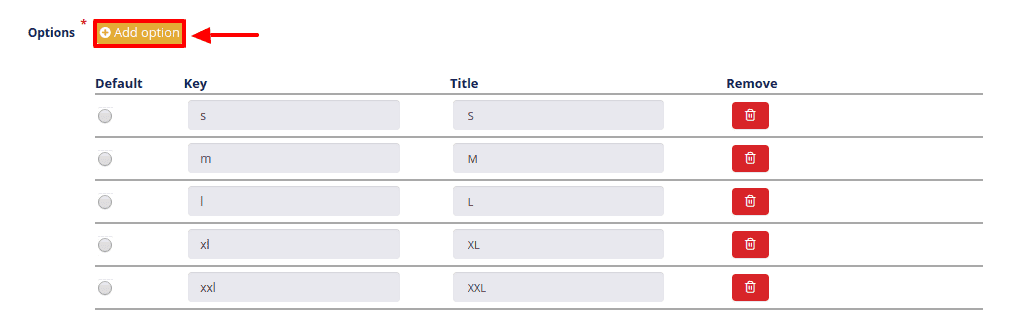
Another attribute that you might want to prepare is Size, as shown in the example below, or diameter e.g. 30, 50, 70 cm.
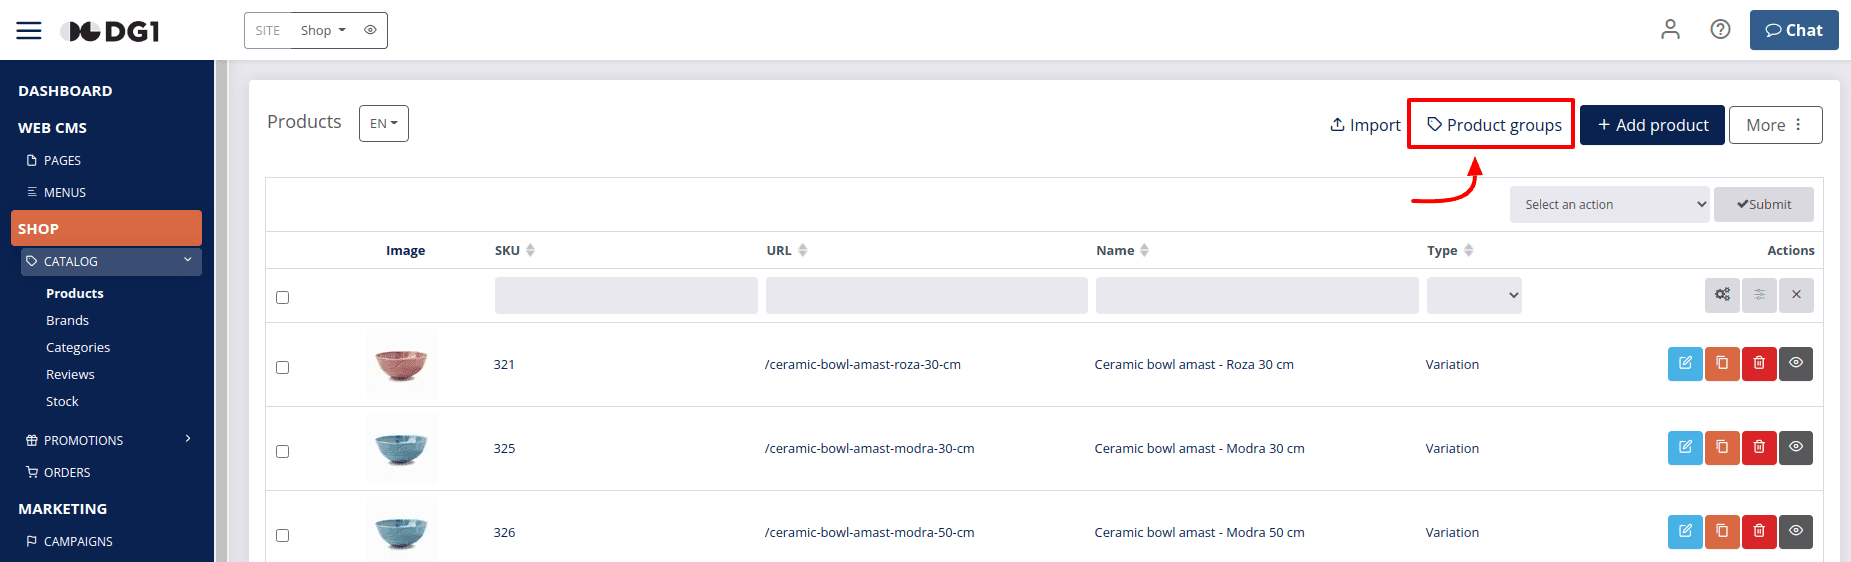
- Once you’ve created all the attributes you need, navigate to Shop -> Catalog -> Products and click Product groups to create a new Product group.
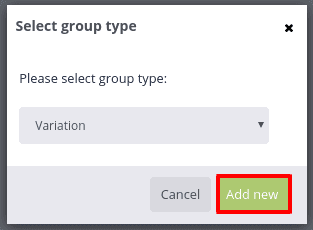
For your products to be displayed as variations, it is very important that you set the group type to Variation in the pop-up window and click Add new.
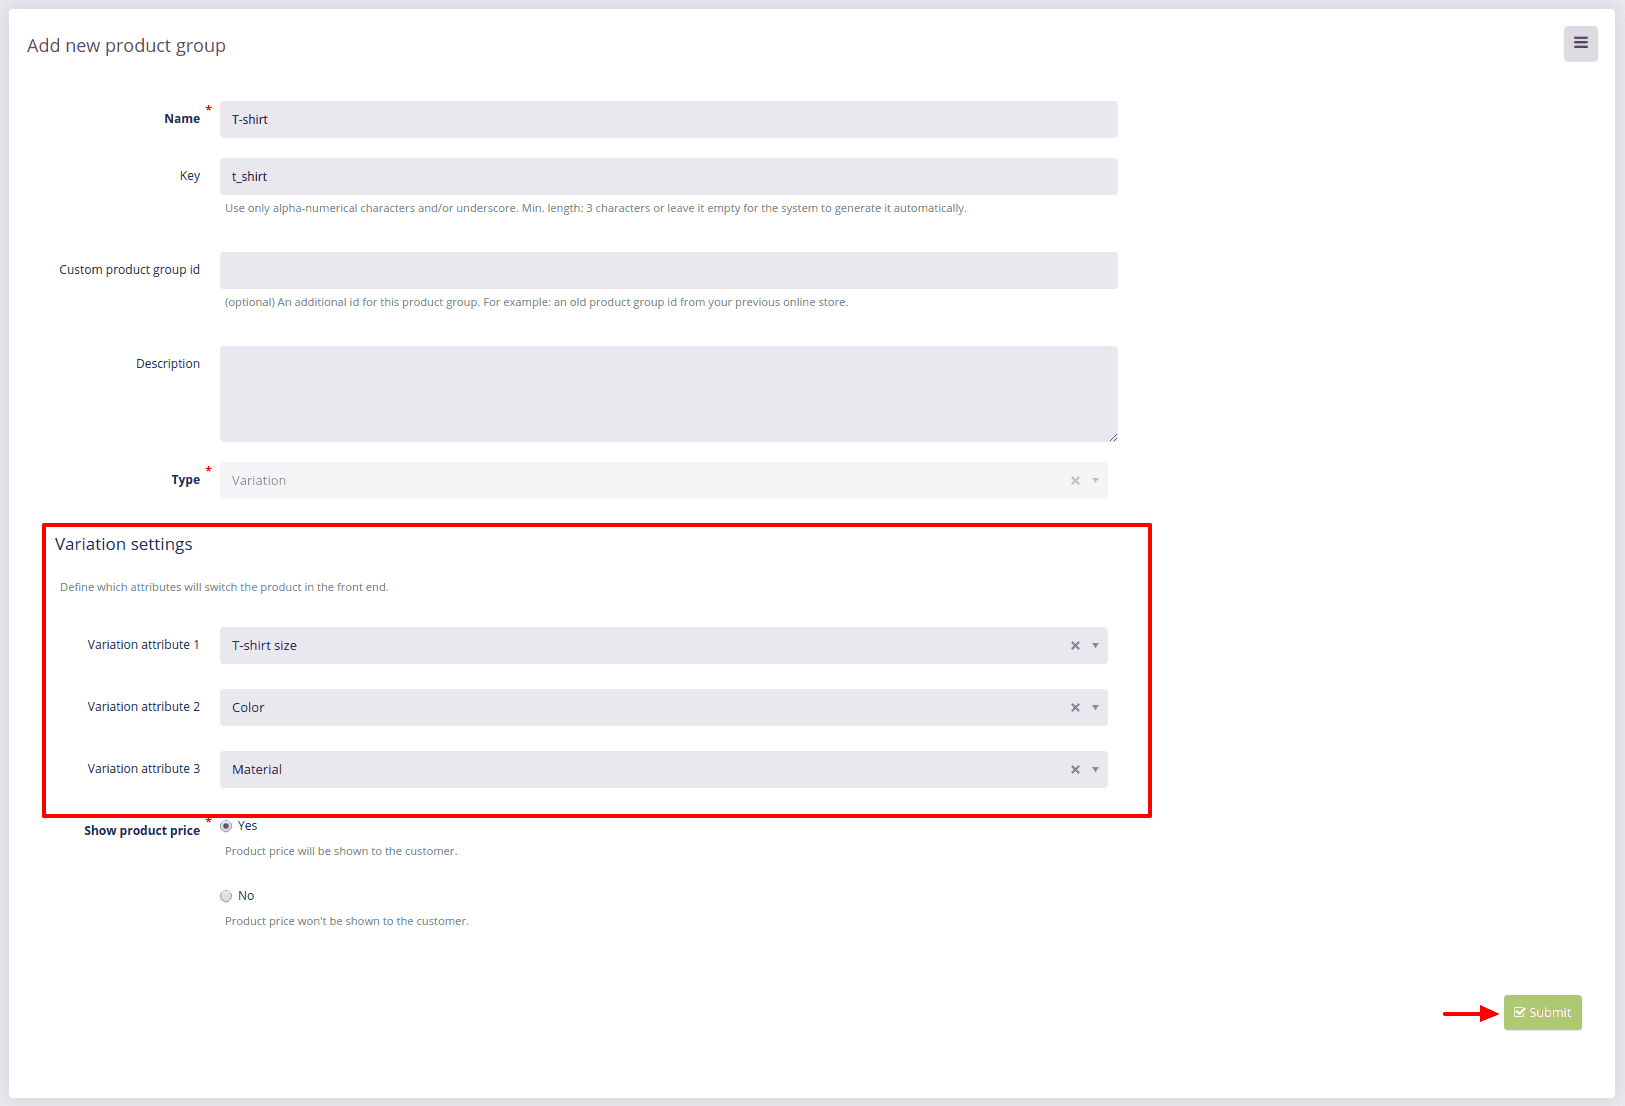
On the Add new product group page you should first name the group of products with variation (example: T-shirt) and then choose Variation attributes under Variation Settings. (Example: T-shirt size, color etc.). Once you’ve selected all the variation attributes you want, click Submit to create a new product group.
Note
You can set up to 3 different variation attributes for each product.
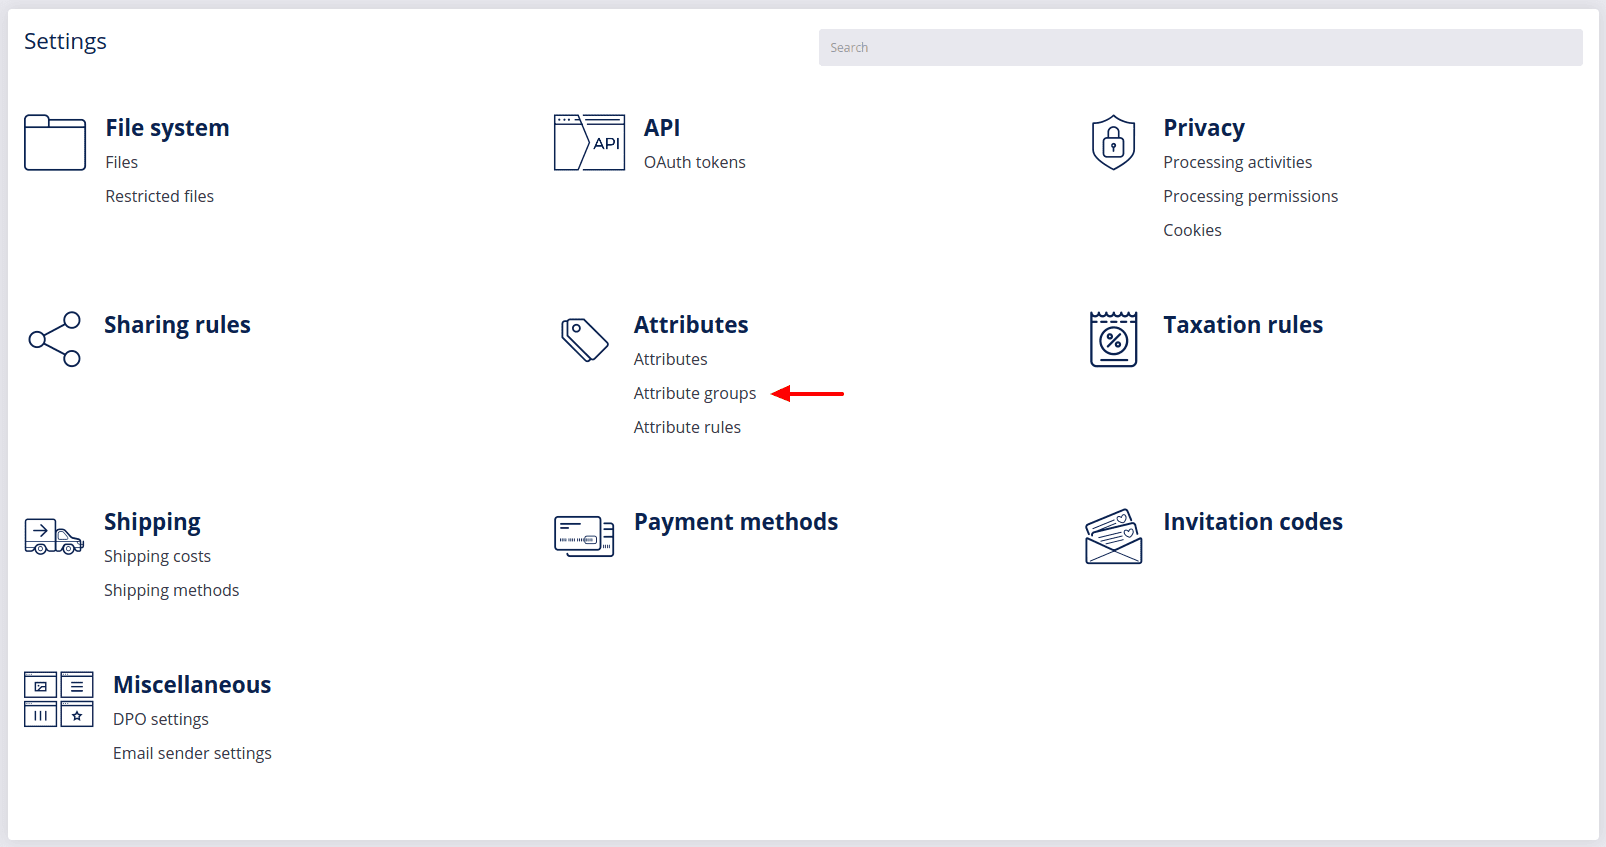
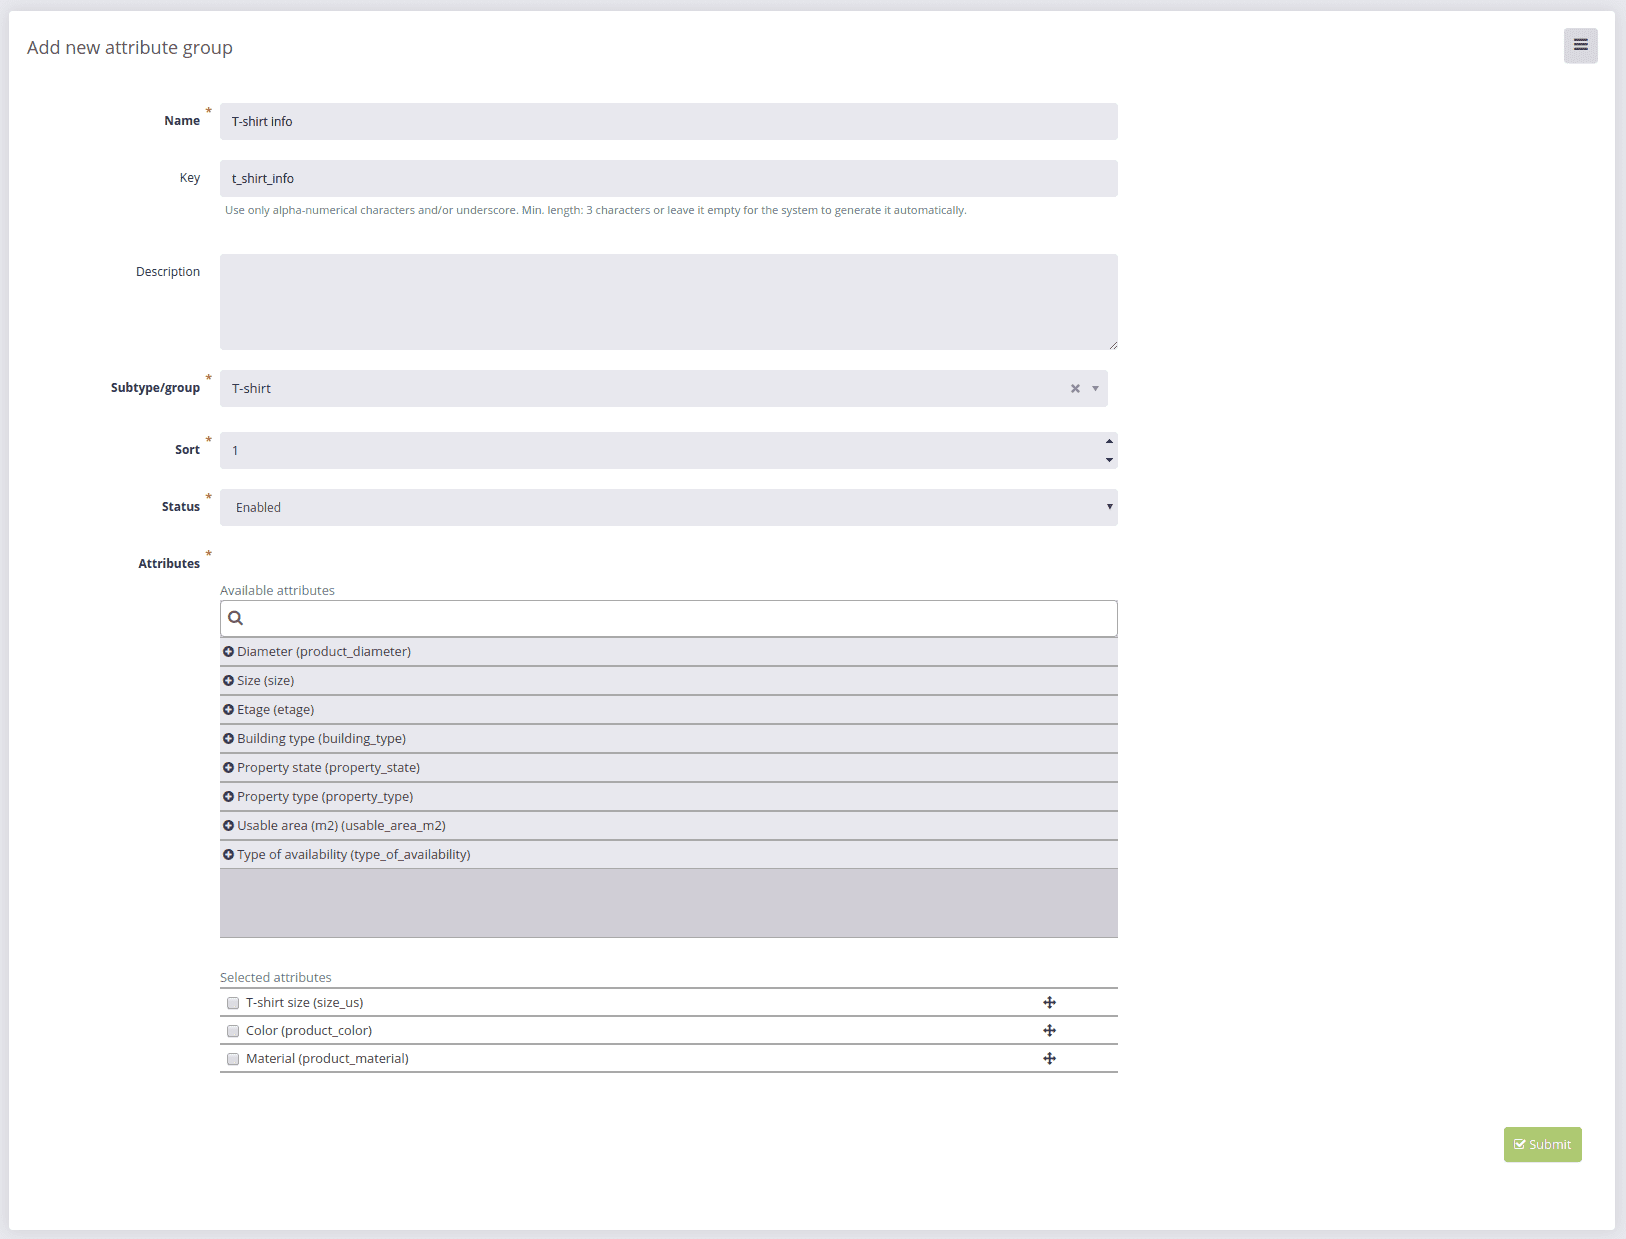
- The next step is to add your attributes to an Attribute group. To do this, navigate to Settings -> Attributes -> Attribute groups and click Add in the top right corner of the page. Enter the name of your new attribute group, choose a Subtype/Group (the product group that you’ve prepared in the second step) and select the attributes that belong to this attribute group – in our case the color and size attributes that we’ve prepared in the first step.
Note
You can also create a new Attribute group on the fly when adding a product to your Catalog.
If the attributes are already used in another attribute group, they will be marked with the red color. If you still decide to use these same attributes, they will be then moved to this new group. This essentially means that you have to prepare a separate set of attributes for each product you want to sell in variations.
- Once you have all the right attributes and groups ready, go to SHOP -> Catalog -> Products and click Add product .
Select the Type of product you wish to add and the Product group to which it will be added (in our case the product type is Variation and the product group is T-shirt) and click Add new .
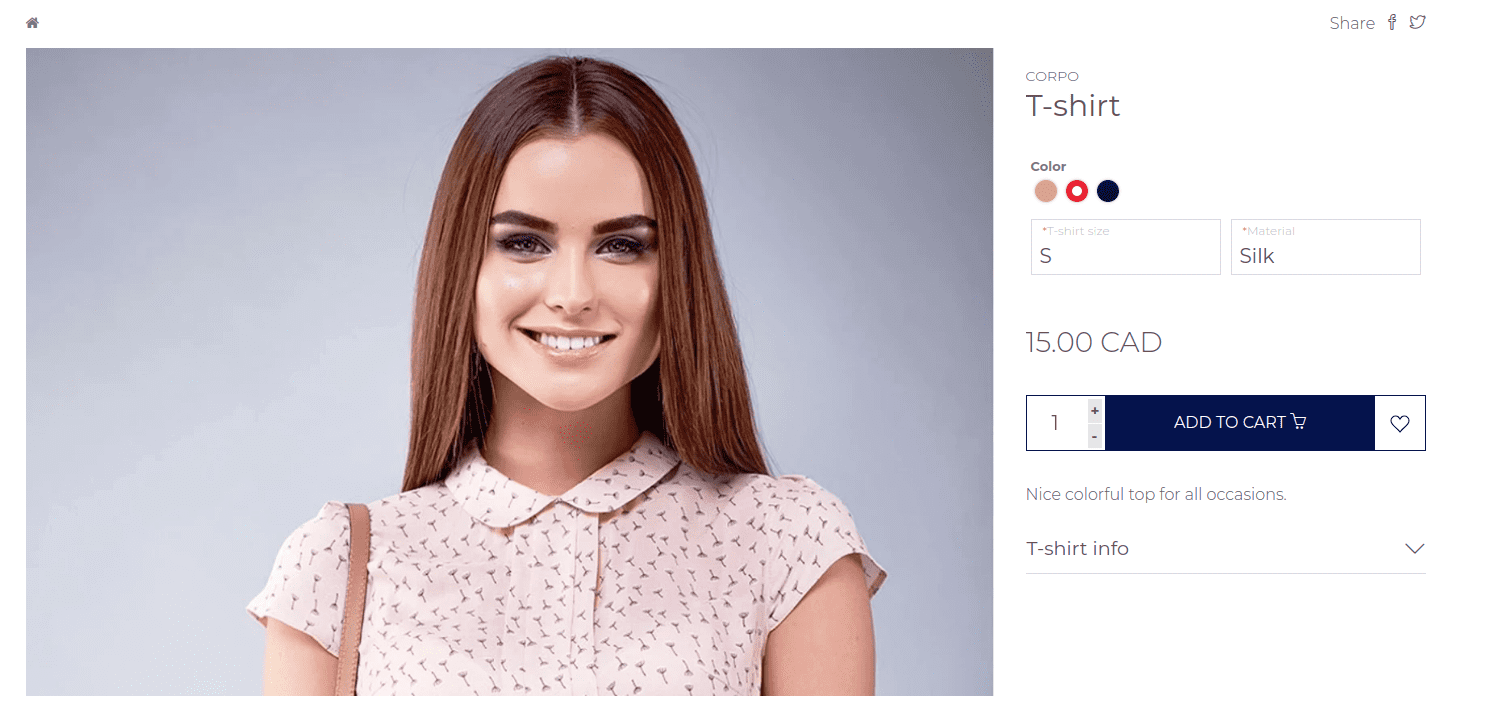
On the upper right-hand side of the Add new product page you should see "Type Variation" and "Group T-shirt". You will notice that the page for adding a variation product mostly has the same settings as you would see for setting a simple product, with the addition of the Variation settings tab.
- Insert all the general data about your product in the Product info tab and upload images and videos. Be sure to also place the product in its category, by checking the box next to its name in the CATEGORIES section on the right. For a detailed overview of general product settings, see chapter Add new product.
- Next, open the Variation settings tab. The first product that you add for variation should be your default product, so be sure to check the box next to the Make this the default product
 . With all subsequent or variation products, leave the box unchecked and click Select default product
 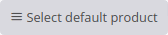 to associate the variation product with the default product.
 - Move on to the Attributes tab and select the attributes for this specific product, making sure they are all variation parameters (color, sizes etc.).
Note
If you decided to skip step 3 above, this is where you can create the attribute group on the fly by clicking the Add attribute group 
- When you have entered all the needed details about your product, click Submit to save your main, default product.
- To add variations to your main product, you must add a new product for each variation. The easiest way to do this is if you Copy the default product on your Products page and change the values in the Attributes tab and Variation settings tab i.e., unselect the checkbox of the Make this the default product option and Select default product to which you are adding a variation.
Note
When you copy a product, remember to also pick the correct category in the CATEGORIES menu on the right and upload any images/videos of the copied product.
For a product that sells in 3 colors and 3 sizes you must add a total of 9 products, each with its respective size and color. In the front end all 9 products will appear as ONE but will change according to the options selected by your shop’s visitors. The product picker with colors in circles will only appear when you use the Select with image attribute type.
# Sort and filter products
Navigate to SHOP -> Catalog and click Products to open your Products page, where all the products in your online shop are listed.
Click the gears icon under Actions on the right side of the page header and pick the product details you would like to have displayed on the products page.
To sort your products in alphabetical order (A-Z or Z-A), use the arrows next to the name of the selected column header.
To filter your products, simply type in the key word in the text box of the respective column and press the filter button  on the right side.
# Edit product
Navigate to SHOP -> Catalog and click Products to open your Products page, where all the products in your online shop are listed.
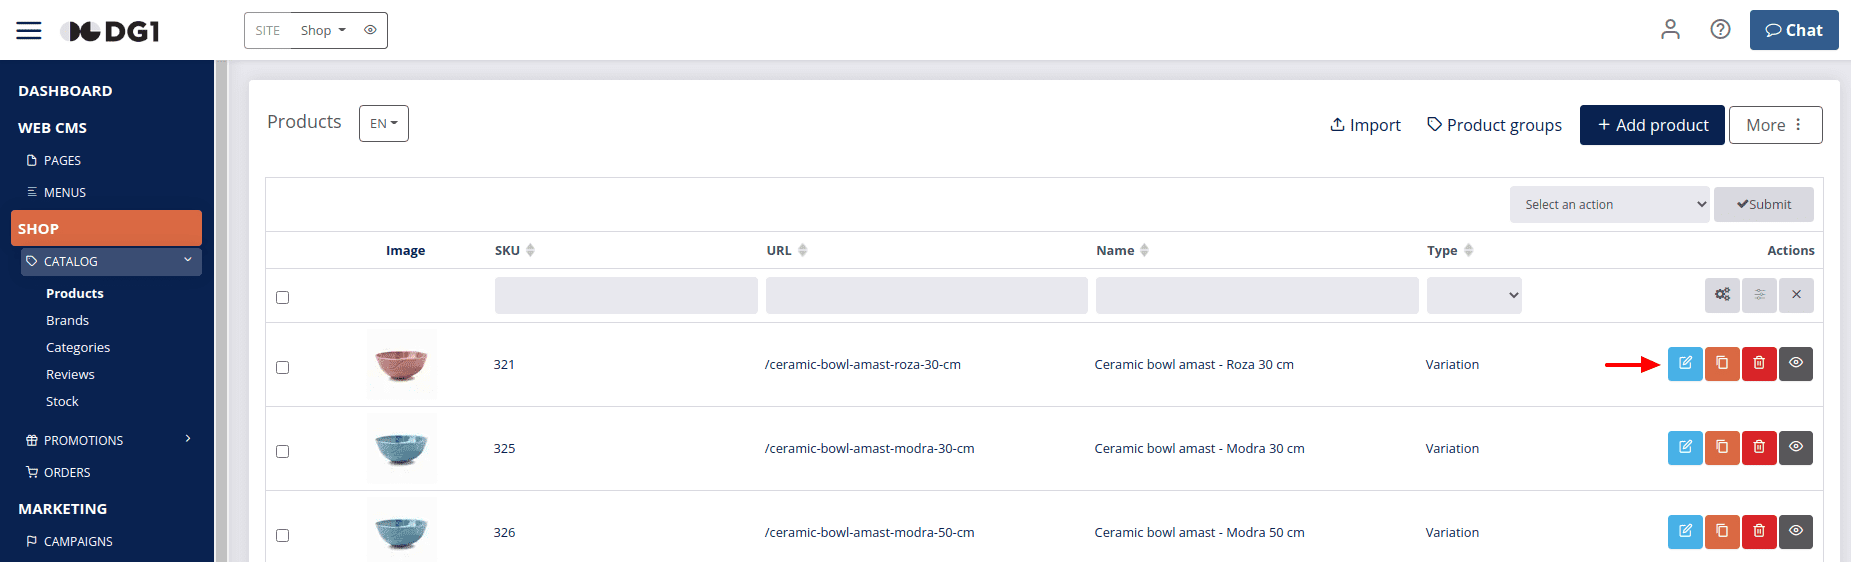
Find the product you wish to edit on the list and click Edit . This will open the product details page where you can change or add all the product information and attributes that are already set for that product. To save your changes, make sure you always click Submit when you are done editing.
# Copy product
Navigate to SHOP -> Catalog and click Products to open your Products page, where all the products in your online shop are listed.
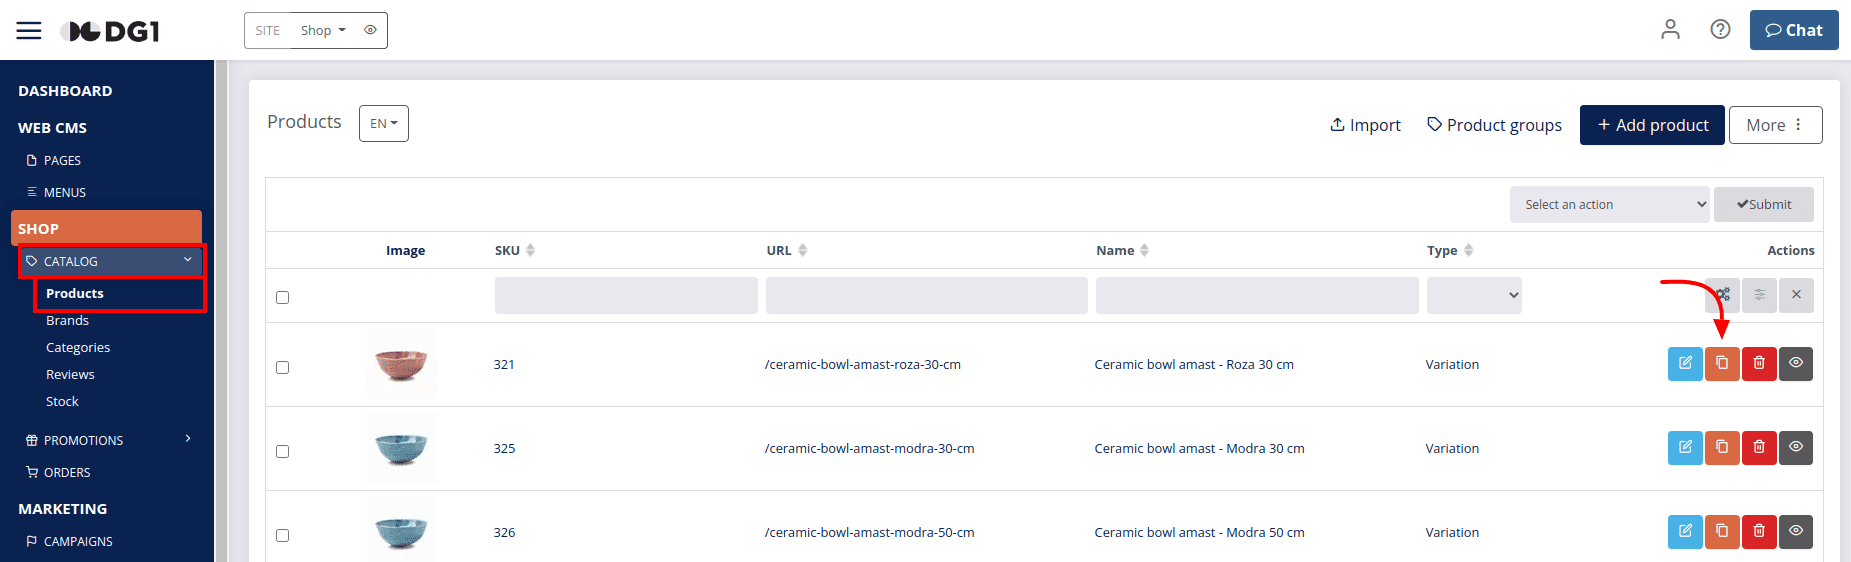
Find the product you want to copy and click Copy on the right side of the product row. You will be taken to the Add new product page with duplicated details of the original product, where you can simply change the desired data. This button is especially useful for adding products with variations.
Note
While most of the original product details are copied, you will still need to choose the category of the new product, upload its images and videos, as well as set the Variation settings and Attributes if you intend to use the copied product for adding variations.
# Delete product
Navigate to SHOP -> Catalog and click Products to open your Products page, where all the products in your online shop are listed.
Find the product you wish to delete, click Delete in the respective product row and confirm deletion with OK.
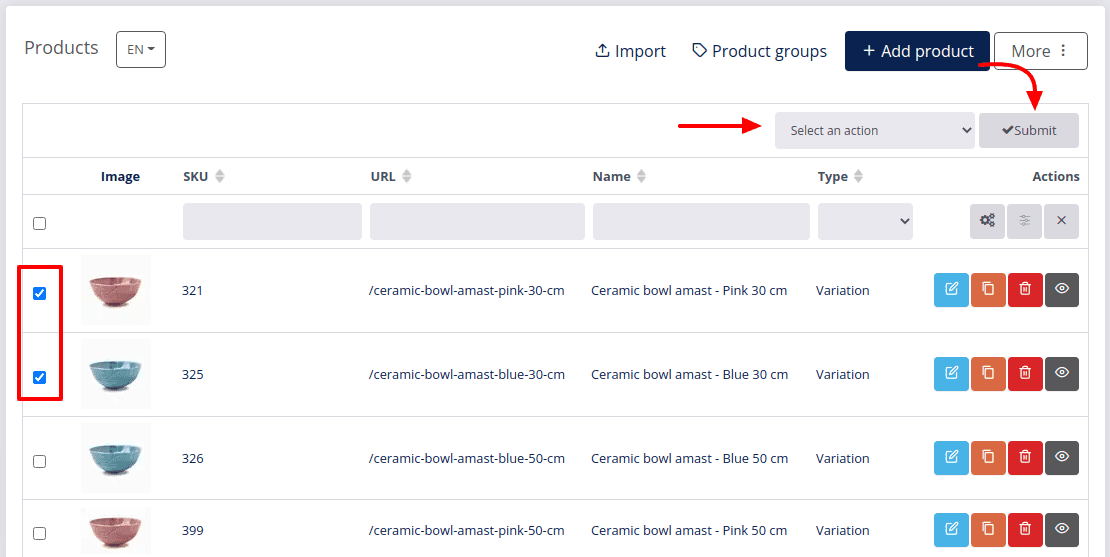
To delete several products at once, select the checkboxes on the left for each product you wish to delete, click on the Select an option menu in the top right corner and choose Delete. Click Submit and confirm deletion with OK.
Note
You can also filter the products you wish to delete using textboxes in the filtering section of the page and selecting all the filtered products with the checkbox on the left side of the same row.
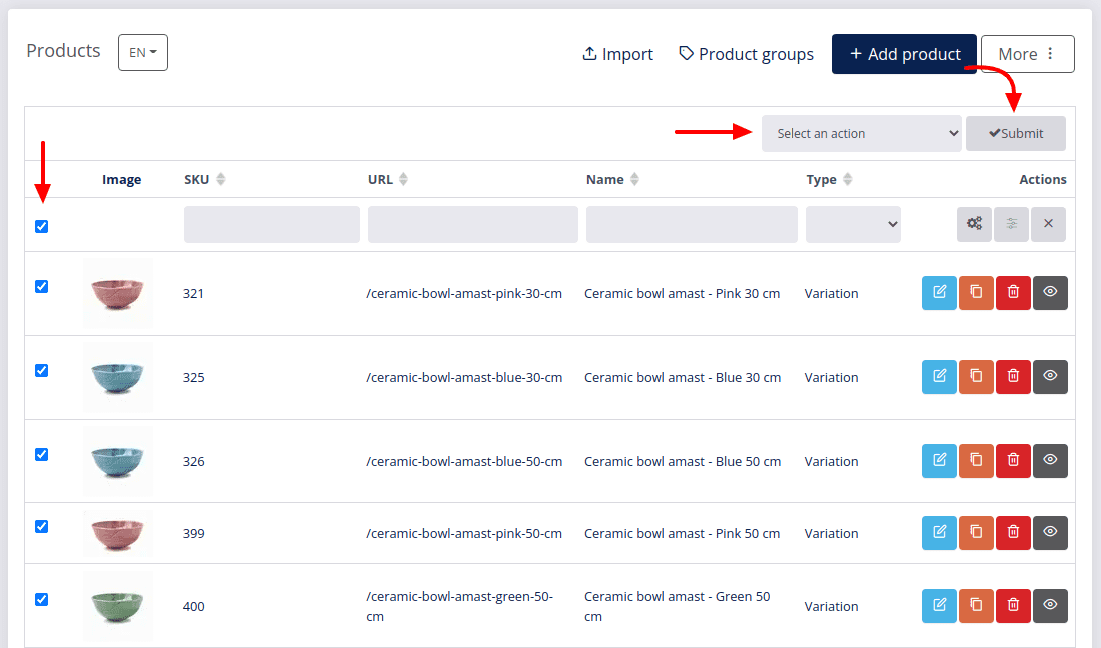
To delete all your products, select the checkbox in the filtering row, click on the Select an option menu in the top right corner and choose Delete. Click Submit and confirm deletion with OK.
# Front-end product view
Navigate to SHOP -> Catalog and click Products to open your Products page, where all the products in your online shop are listed.
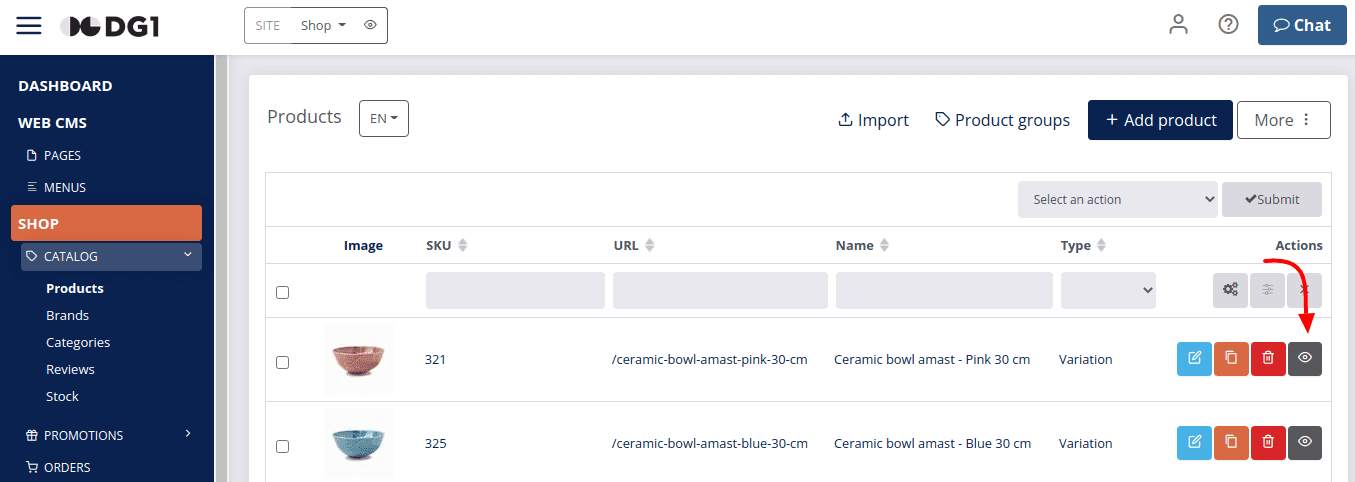
Find the product you wish to see in the front-end view of your online shop and click the Front end view  button on the right side of the product row.